BREAKING

Showing posts with label TRICKS. Show all posts

Friday, 24 April 2020

April 24, 2020

HOW TO SHARE USB PORT BY USING USB REDIRECTOR FOR REMOTE SERVICES

What is usb redirector ?
Usb redirector is the software which allows remote usb devices sharing between client and technician users via remote connections such as Vpn (virtual private network) or Tcp (transmission control protocol) over the internet. Usb redirector acts as virtual usb hub due to the fact that it shows shared usb devices in your computer as if they are direct connected. Whether you are technician or client usb redirector is very important especially when you want to access usb devices such as flash drives, web cameras and dongle/ box remotely.

 I am going to show you how to share usb port for connected devices over the internet by using remote programs like team viewer and usb redirector. Before proceeding, you have to consider the following requirements;

> Remote computers (for client and technician)
> Team viewer (recommended)
> Usb redirector (client and technician setups)
>  Active internet connection
> Usb devices for sharing

Steps:
1. Install remote desktop program (team viewer)

2. Open team viewer then install vpn drivers. To do that, click on extras then options, dropdown to advanced then show advanced options, again dropdown to advanced network settings there you will find the option to install vpn drivers.

3. On the remote control menu enter your partners id, then choose vpn and click connect. After that you will be redirected to enter password that is displayed on your partner’s computer, proceed as instructed. If you start remote control; allow multiple connections on the pop up window which describes as

“There is already a connection to this computer! You can start a vpn connection any time with the command ‘extras/vpn/start’ in the remote control window. Would you like to establish another connection any way?” 

Proceed by allowing connection.

4. A pop up window will be displayed after configuring vpn connection. Minimize the window and configure new connection via remote control. A small window will appear showing that “there is already a connection to this computer! Would you like to establish another connection? Choose connect to establish a connection while the same partner’s id will be remembered automatically.

5. When remote connection has been successful established, your partner’s desktop will appear on your desktop. Now install usb redirector client setup on your partner’s computer remotely.

6. Install usb redirector setup on your computer. At the top of usb redirector program click on help then enter license key. The key is located at the same directory of the usb redirector setup as serial.txt. After installing it, you will see the list of usb devices available for sharing. At this point, you are free to insert any usb device for sharing or right click on it for sharing if already connected to your computer.

7. Go back to your partner’s desktop, open usb redirector client setup. You will see remote usb device(s) available for connection. Right click on any device then choose connect usb device. In case you do not see usb devices available for connection, click on connect so as to add usb device server. Copy and paste the IP address (from vpn connection that you minimized) of the remote server to the remote client then click ok.

Done!
You have successfully shared usb device with your partner’s remote computer.

Click here to watch a video tutorial.

Downloads
 Free download team viewer here

compressed file details:
> File name: Usb redirector with serial
> Version 6.1
> Category: TRICKS
> Password: Encrypted file
> Extension: .rar
> Size: 20 mb
   No Threats! File scanned by Official Kaspersky Antivirus

                                                              100% Working.Tested by;

Paid file
Whats app/call; +255673989040


https://mega.nz/file/nxcyWKAS#EKiDrL68vXXoJrMC2C5xH3pEyovc9U_6GqpOkQLLZno


Friday, 28 February 2020

February 28, 2020

HOW TO BACKUP FIRMWARE OF MEDIATEK SMART PHONE BY USING SP FLASH TOOL AND WWR TOOL

If you are struggling to find the ways on how to make a backup of your mediatek smart phone firmware, the following guide is tested, helpful and easy for you. There are many advanced tools for performing firmware backup operation but I am going to show you how to make a backup of mediatek firmware by using Sp flash tool. Advanceed tools which are widely used by technicians include NCK, Infinity Cm2, Avenger box Miracle box or Thunder edition and other tools.

Requirements before making backup:
> Mediatek device ( Smart phone )
> Computer
> USB cable
> MTK drivers
> Wwr tool
> Sp Flash tool

What is Wwr tool ?
Wwr tool is a software which is used for splitting Rom ( Read Only Memory ) or  a firmware created by readback using Sp Flash tool. This tool is also used to generate an empty scatter file during the preliminary stage of making a backup from mediatek smart phone by using Sp Flash tool. In addition to that, Wwr tool can be used to analyse  preloader partition of a firmware, show CPU type, memory type and so forth. Wwr tool was developed by waaavv , so credits go to him.

Conditions:
1. Your phone battery should be charged at least 50% to avoid suddenly shutting down before completing backup process.
2. Make sure that you have installed mediatek drivers properly.

Steps:
1. Open Wwr tool and choose language of your preference. The tool have two options of language including Russian and English.To change language click on about the program and you will see two language options there.


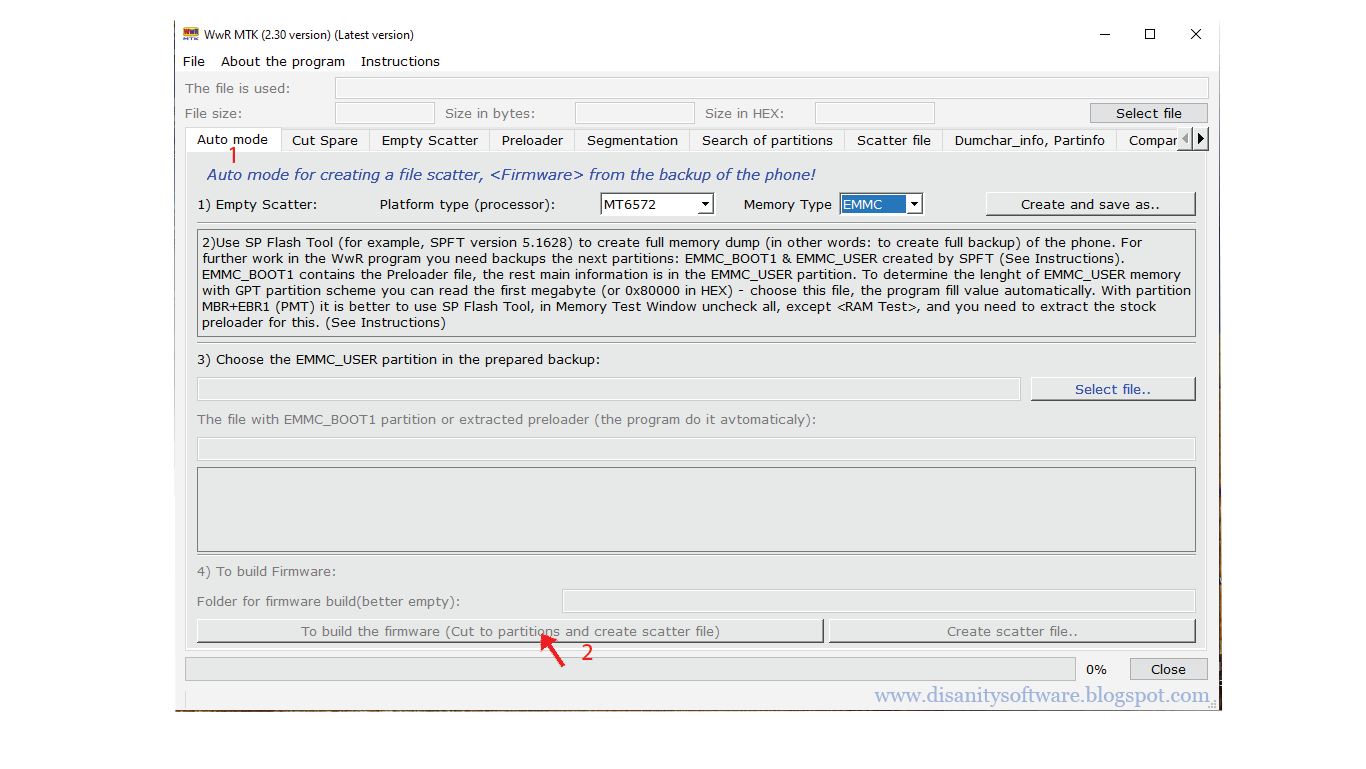
2. Under auto mode menu, choose platform type ( processor ). Here you are supposed to choose the right platform for your mediatek smart smart phone. Specify memory type whether emmc or nand then click on create and save as. A small window will pop up in order to choose the location where you want to save new scatter file.


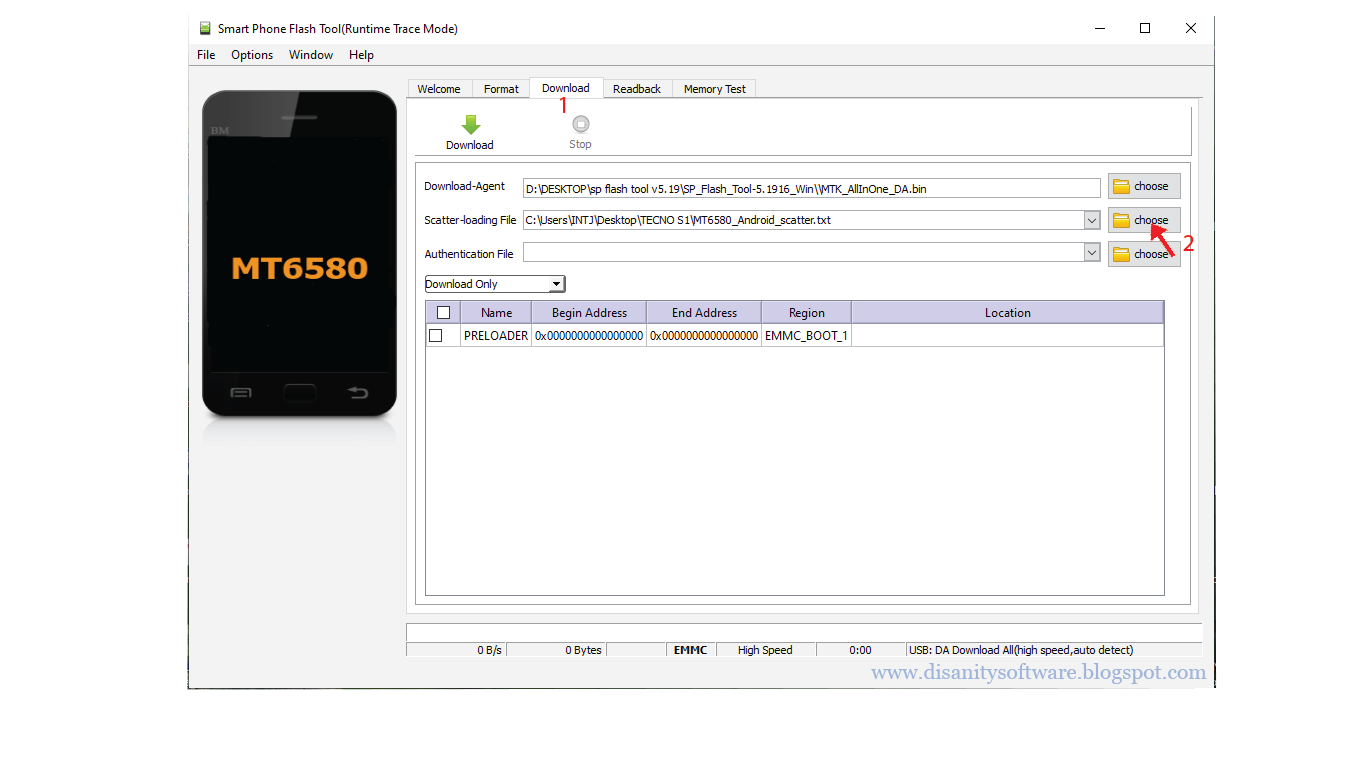
3. Open Sp flash tool. Under download menu load scatter file that you have previously created and saved.


4. Click on readback menu. Add a new readback partition then double click it so as to specify the location where you have saved scatter file. When a small window pops up, specify region, start address and length of your readback partition.


5. Open scatter file and look for preloader partition. Copy physical start address ( start address ) and partition size ( length ).


6. Paste the addresses to a small window of sp flash tool, specify region to EMMC_BOOT_1 and click OK.


7. Switch off your phone, click readback and connect it to the computer via USB cable. Readback operation should start and when it completes, you will see a tick.


8. This is the first half of reaback operations which helps you to get preloader partition with the name of ROM_0  generated automatically. You have to analyse ROM_0, extract preloader  and save as. To do that, you have to open wwr tool and click on preloader menu then select file. A small window should appear so that you can browse to  the location  where you have saved ROM_O.


9. Click on preloader analysis and wait for it to complete. In order to save the analysed preloader, click on " To extract preloader and save as ".


10. In this step you are going to readback the full rom but you are supposed to get exact rom size. You can get rom size by reading information of your phone by using advanced software as I mentioned above. I am going to show you how to get full rom size by using Sp Flash tool and Miracle box.

> By using Sp Flash tool. Load scatter file that you have saved to the same location where there is  analysed preloader.


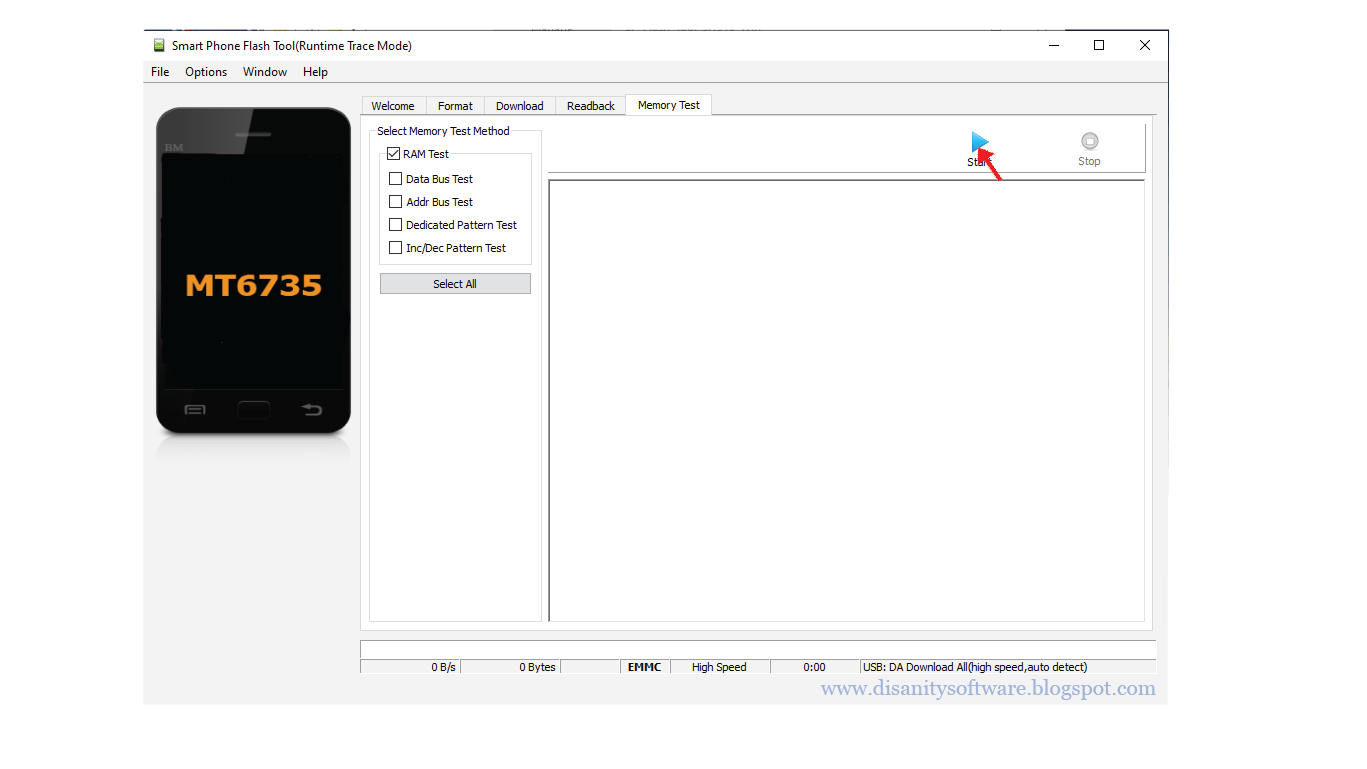
i) Click on memory test and make sure that you tick only Ram test.


ii) Click on start and connect your phone with the computer by using USB cable. You will see a tick showing that " Memory test ok ".


iii) Your full rom size is located at EMMC_PART USER. Remove zeroes between X and 1 or leave a single zero.


> By using Miracle box you can read information of your smart phone EMMC and  get the following results.


11. Repeat the same procedure of getting readback in order to have full rom. Region should be EMMC_USER, start address should be 0x0 and length should also be the size of your full rom which you have got by using the above methods. Remember to save the full rom with different name so that you can identify the first readback and the second readback. You can rename and save it as ROM_1 or any name which makes the difference.

When you start to readback full rom it may take a while to complete because of the size of your rom (  userdata and system partitions tend to be larger in size ). A tick will appear after successful readback and you can proceed with the next step.


12. Open Wwr tool and make sure you choose correct platform and memory which are found under the  auto mode. Look for the guide line which is marked by number 3 ( To choose  the EMMC_USER partition in the prepared backup). You have to click on ' select file ' and load the full rom of the second readback ( ROM_1 ). If you see a pop up window which requests you to to select partition of EMMC_BOOT_1 containing preloader, proceed as instructed so as to get full rom backup with partitions.


13. After loading ROM_1 and Preloader,  you can click on scatter file to see the partitions with false and true options. The word ' false ' on partition indicates that partition can not be flashed when loading scatter file to Sp Flash tool. The word ' true ' indicates that partition can be flashed when loading scatter file to Sp Flash tool. If you wish to make modification, you can change the present word by performing double click on it.


14. Finally, select auto mode then click on " To build firmware ( cut to partitions and create scatter file ) ". Browse to the location that you want to save  full backup and click OK.
Backup done ! You can download tools below;

 Compressed file details:
> File name: Sp Flash tool and Wwr tool
> Versions: v5.1916 and v2.30 respectively

> Category: Tricks
> Password: disanitysoftware.blogspot.com
> Extension: .rar
> Size: 56.67MB
   No Threats ! File scanned by official Kaspersky Antivirus.                                          


                                                                       100% Working. Tested by ;


http://www.mediafire.com/file/kdx4sq6vt29xd2n/Sp_Flash_tool_and_Wwr_tool.rar/file


Tuesday, 25 February 2020

February 25, 2020

HOW TO USE SP FLASH TOOL TO FORMAT SINGLE PARTITION OF MEDIATEK SMART PHONE

Mediatek (Mtk) Smart phone  is powered by mediatek chip. In the mediatek chip there is EMMC ( Embedded MultimediaCard ) which stores firmware in partitions table. These partitions are called regions for instance Emmc_Boot_1, Emmc_Boot_2 and Emmc_User. Sometimes these regions need to be formatted properly with enough knowledge in order to fix some problems or making modifications. If you want learn or increase knowledge, please continue to read my instructions below:

Requirements before formatting
> Mtk device ( Smart phone )
> Computer
> USB cable
> Mtk  drivers 
> Sp Flash tool

Conditions
1. Before attempting to format, phone should have a charged battery atleast 50% to avoid suddenly operation failure.
2. Make sure that you have installed Mediatek drivers properly.

 Steps:
1.Open Sp Flash tool


2.On the Download menu load scatter file for your exactly phone model. Scatter file is a text file which contains information about mediatek chip partitions table. 


3. Select format tab


4.Check on manual format flash


5.Specify the region, begin address and length of the format area.

  -To do that, you have to open scatter file of your smart phone with any text editor program for example notepad. After opening it, press Control + F then type partition or region name that you want to format.


See begin address below:

See format length below:


6. Copy and paste the addresses from that region to sp flash tool.


7. Click on start


8. Switch off and connect your phone with the computer. Sp Flash tool will detect your phone for intended operation. If it does not detect your phone, repeat the process by pressing volume down key, volume up key or combination of volume buttons simultaneously with the connection.


9. Once the format operation is completed, you will see a tick. From that point, remove USB cable and if the battery is removable just reinsert it and power on your smart phone.


 Note:  Do not format your phone without knowledge on how to format it properly.
            Make back up of your phone's region before attempting to format if possible.
            If you face any difficult in formatting, please drop a comment below or contact me.

> Download Sp flash tool version 5.1916 and MTK drivers auto installer version 1.1352.